Updated February 2024 to update installation instructions.
Updated March 2022 to improve instructions on the steps needed for HEIF / HEIC image support.
Updated February 2022 to include the new option Ignore time zone and daylight savings changes.
Updated February 2022 to include changes to how the Timeline functions.
Updated February 2022 to update the High DPI screen instructions.
Rapid Photo Downloader imports photos and videos from cameras, phones, memory cards and other devices at high speed. It can be configured to rename photos and videos with meaningful filenames you specify. It can also back up photos and videos as they are downloaded. It downloads from and backs up to multiple devices simultaneously.
This documentation contains a description of Rapid Photo Downloader's features and how to make the most of them. If you notice any errors or have some suggestions for how it can be improved, please don't hesitate to to share your thoughts using the discussion forum.
The following RAW image formats are supported: 3FR, ARW, CR2, CR3, CRW, DCR, DNG, FFF, IIQ, MEF, MOS, MRW, NEF, NRW, ORF, PEF, RAF, RAW, RW2, SR2, SRW, and X3F.
These additional photo image formats are also supported: JPEG, HEIF / HEIC, TIFF, and MPO.
Supported video files are: 3GP, AVI, M2T, M2TS, MOV, MP4, MPEG, MPG, MOD, TOD, and MTS.
Not all Linux distributions provide the necessary software libraries to support all these formats. If you run the program from the command line using the -e or --extensions argument, the it will report which extensions are supported on your system:
rapid-photo-downloader --extensions
Rapid Photo Downloader can be installed using your Linux distribution's software store. The version packaged by your Linux distribution may not be the most recent. To get the latest version, see instructions on the download page.
Compared to JPEG images, the High Efficiency Image File Format is a relatively new file format used by Apple, Canon, and other manufacturers. It uses more advanced file compression than JPEG, and can store High Dynamic Range (HDR) images. It uses the file extensions .HEIF, .HIF, and .HEIC.
Rapid Photo Downloader uses two programs to handle HEIF / HEIC files:
- 1ExifTool 10.63 or newer is required to read their metadata, which is necessary for downloading them. Practically all supported Linux distributions include a recent enough version of this program.
- 2Pyheif is required to display their thumbnails. As at March 2022, most Linux distributions do not include this program.
However, you can add pyheif thumbnail support yourself on older Linux distributions. Very recent distributions may not support the following method.
First, Install the python tools pip, setuptools and wheel for your system. For instance, on Ubuntu:
sudo apt install python3-pip python3-setuptools python3-wheel
Or on Fedora:
sudo dnf install python3-pip python3-setuptools python3-wheel
Second, install pyheif for your logged in user (do not use sudo):
python3 -m pip install --user pyheif
Starting with version Rapid Photo Downloader 0.9.27, iOS devices are accessed using a software library written specifically to communicate with iOS devices, libimobiledevice. In earlier releases, gPhoto2 was used, but gPhoto2 is unreliable with iOS because it appears Apple does not follow the PTP standard.
Tip: Using a Linux distribution that is not too dated will ensure a better experience. For example, Ubuntu 20.04 has more up-to-date software for working with iOS than Ubuntu 18.04.
If Rapid Photo Downloader shows an error message saying that it requires additional software be installed that interacts with iOS devices, depending on which Linux distribution you use, you can install the following software from a terminal as follows:
On Debian / Ubuntu:
sudo apt install libimobiledevice-utils ifuse
On Fedora:
sudo dnf install libimobiledevice-utils ifuse
On openSUSE:
sudo zypper in imobiledevice-tools ifuse
Tip: After installing this additional software, you must restart Rapid Photo Downloader.
Tip: Rapid Photo Downloader 0.9.27 or newer will not download from iOS devices on CentOS, because CentOS does not package ifuse.
Tip: Learn more about Downloading from iOS Devices in the documentation below.
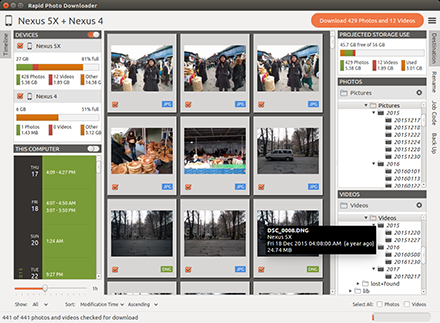
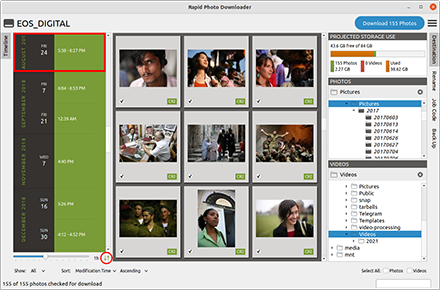
Work through the window from left to right. On the left are the download sources — where you'll be downloading files from. The left side also includes the Timeline, which shows dates and times your source photos and videos were taken. In the middle of the window are the thumbnails. Use the right side to specify and preview where you want to download your photos and videos to — the destination folders. The right side is also where you specify how to rename your files and back them up as you download them.
Rapid Photo Downloader downloads from two different types of sources: automatically detected devices, and from a folder on your computer. Each type has its own panel on the left side of the window. You can download from both sources simultaneously, or either one.
Use the toggle switch located in the right side of each panel's title bar to turn on and off each type of download source:

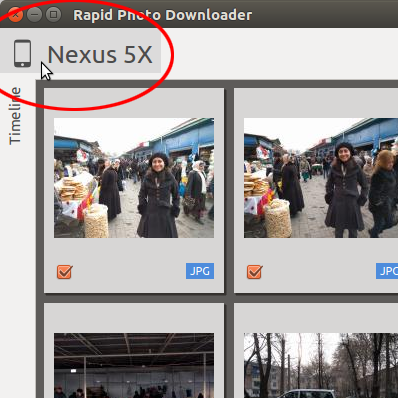
You can hide or display the download sources by clicking on the name or names of the download sources at the top left of the program window:
Devices are things like cameras, smartphones, hard drives, memory cards and other things you can plug into your computer that contain photos and videos. You can download from multiple devices simultaneously — as many as your computer can handle at one time.
You can plug in a new device at any time — before starting the program, after the program has started, or while a download has already started.

Tip: In its default configuration, Rapid Photo Downloader looks for folders such a DCIM folder in a device to determine whether it is a device from which to download. You can change this by adjusting the program settings.
Tip: If automatic detection of backup devices is turned on, Rapid Photo Downloader will always check to see if it can use a device like a hard drive for backups before it will it will seek to use it as a device from which to download.
Unlike devices like hard drives or memory cards, when a camera or Android smartphone is plugged into your computer, only one program at a time can access it (the same applies to any MTP or PTP device).
Because only one program at a time can access the camera or Android smartphone, if another program is using the it — Gnome Files, for example — where possible Rapid Photo Downloader will request the other program give up its exclusive control of it. For programs using Gnome technology (GVFS to be precise), that means "unmounting" or "ejecting" the camera / smartphone.
Tip: If Rapid Photo Downloader's request to another program to give up its exclusive access to your device fails, you must either close that other program or get your file manager to "eject" the device while keeping the device plugged in.
Unfortunately KDE provides no mechanism for other programs to request a KDE program to give up exclusive access to the camera / smartphone, so if Rapid Photo Downloader cannot access your phone or camera, the only way to solve the problem when running KDE is to close and KDE programs that may have accessed it.
You can download from smartphones, tablets, and other such pocket computers, provided they are supported by gphoto2 and are connected via a USB cable.
Tip: Be sure to follow the advice in the section above about ejecting your phone or tablet from your file manager!
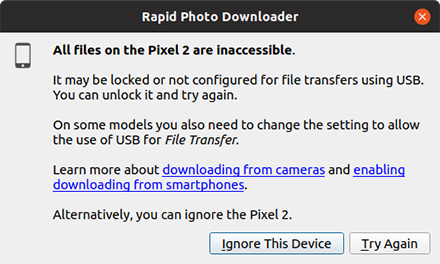
Smartphones and tablets must be unlocked before they can be accessed by the computer. Rapid Photo Downloader will prompt you to unlock a smartphone or tablet if it cannot access its files:
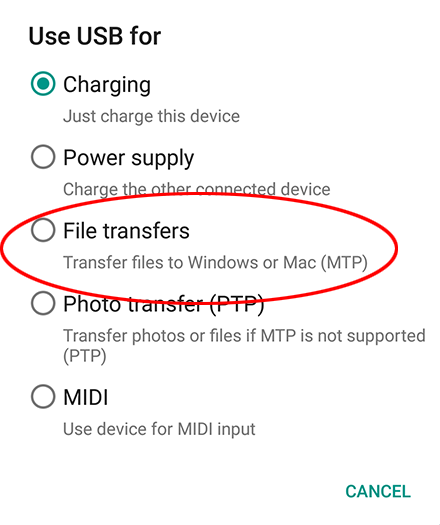
In addition to being unlocked, Android 6.0 or later devices must also be configured to allow file transfers every time you plug it in. To enable file transfers on an Android 6.0 or later device:
- 1Swipe down from the top of your device's screen.
- 2You should see the option "USB for charging" or "Charging this device via USB" (or similar).
- 3Activate the option card to specify the USB preferences.
- 4On Android 6 or 7 devices you will likely see a list similar to this:
- 5On Android 9:
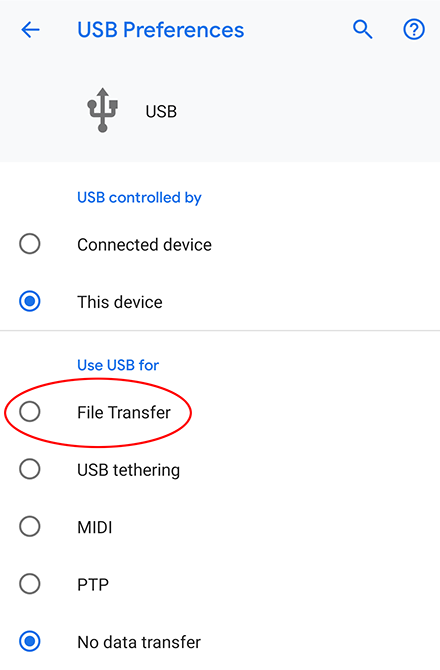
- 6Choose the option circled in red ("File transfers" or "File Transfer")
Starting with Rapid Photo Downloader 0.9.27 and newer, to improve compatability and reliability, Apple iOS and iPadOS devices are accessed differently from Android devices.
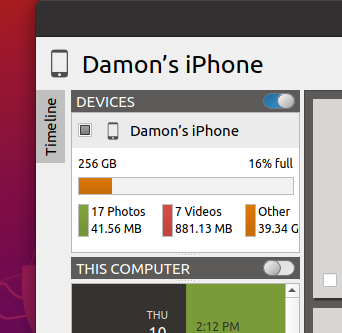
Before the photos and videos on the Apple device can be accessed, the Apple device must be first set to trust the comptuer it is plugged into. Read Apple’s instructions about how to do this. When an Apple device trusts the computer, the computer can then pair with it. Only once it is paired can its photos and videos be accessed.
Like Android devices, you can plug in multiple Apple devices at once.
Rapid Photo Downloader will access the Apple device by mounting its file system directly using FUSE.
Tip: If the Apple device is being plugged into the system for the first time, on some systems it can take a few minutes for it to appear after it has been plugged in. On rare occassions a reboot might be required.
Tip: Unlock your Apple device to allow Rapid Photo Downloader to access it. If the device is plugged into the computer before Rapid Photo Downloader has started, unlocking it will mean Rapid Photo Downloader starts without a delay.
Professional-level cameras can write photos to two memory cards. When downloading directly from a camera, and two memory cards are present, the program will display an emblem or emblems beneath the thumbnail showing which memory card the file comes from. If the same photo exists on both memory cards, the program will display and download only one of the duplicate photos:
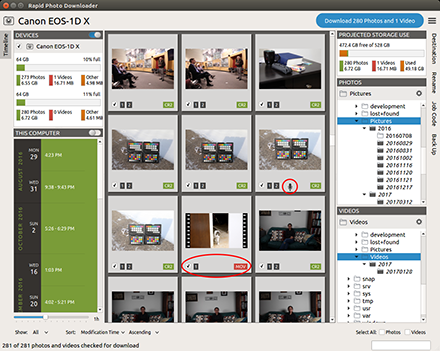
Tip: If you download directly from the memory card using a card reader (and not the camera itself), exercise caution when downloading videos and audio annotations from dual card cameras. The Canon 1D series of cameras, for example, can be set to write duplicate photos to both memory cards, but they will not write videos or audio annotations to both cards. Instead, they will write the videos and audio annotations to only one card (note in the screenshot above the video is saved on only one memory card; the same is true of the audio annotation). If you mistakenly assume both cards' contents are identical to the other card, and you download only from the card without the videos and audio annotations, you may inadvertently not download them.
For those devices which you want Rapid Photo Downloader to permanently or temporarily ignore, you can right-click on the device and choose one of the two options:
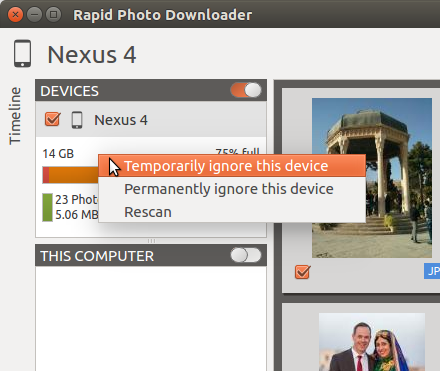
To temporarily ignore a device means to ignore it only until the next time the program is run. To permanently ignore it is to blacklist it.
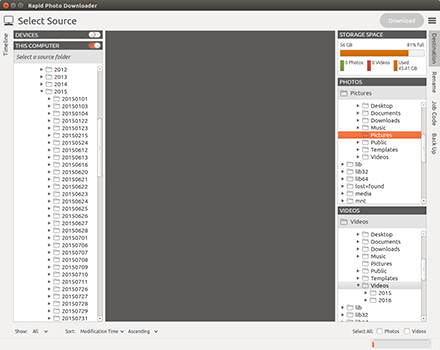
You can specify a folder on your computer from which to download. Any photos and videos in its subfolders will be included too.
Starting with version 0.9.27, by default Rapid Photo Downloader does not display system folders in This Computer for the download destintation folders for photos and videos. Instead, it only shows the folders /home, /media, and /mnt; on systems that use the /run directory to mount external media like Fedora, that is also displayed.
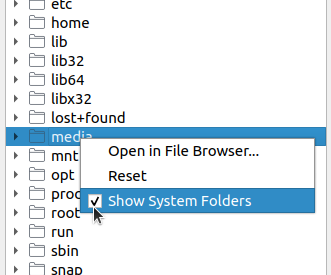
If you want to display system folders, right click somewhere in the This Computer panel, or the panels for the download destintation folders for photos and videos. Click on Show System Folders:
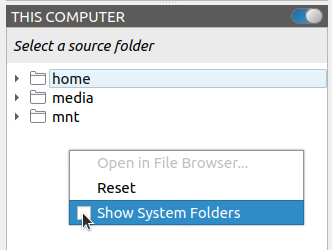
System folders will then be displayed in the This Computer panel, as well as the panels for the download destintation folders for photos and videos. To show only non-system folders, repeat the process but remove the checkmark:
If any one of This Computer or the download destintation folders for photos and videos is set to a system folder, then you cannot change this setting.
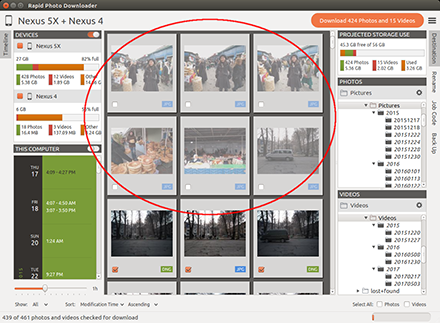
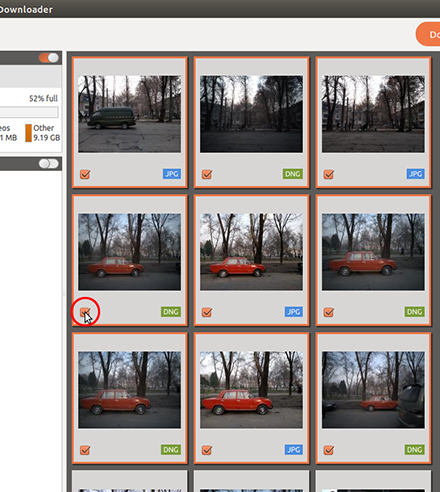
In the picture above, the thumbnails circled in red are dimmed because they have been previously downloaded. If you want to download them again, you can check them for download by placing a checkmark beside them.
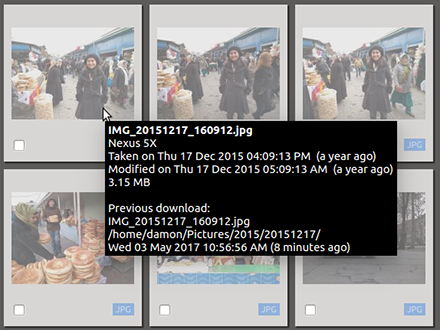
Move the mouse over the thumbnail of previously download photo or video to see when and where it was downloaded to, and with which filename:
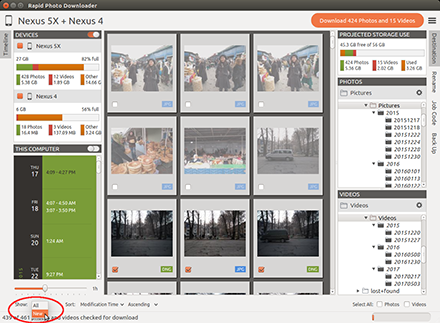
To hide files that have been previously downloaded, choose New from the Show drop-down menu in the bottom left of the main window:
A file will only be downloaded if it has a checkmark.
You can simultaneously apply a checkmark to multiple files — there is no need to manually place or remove a checkmark for each file.
There are several ways to check and uncheck multiple files. The first is select the thumbnails, which can be done with the Select All Photos and Select All Videos controls at the bottom right of the window, or with the mouse, illustrated here:
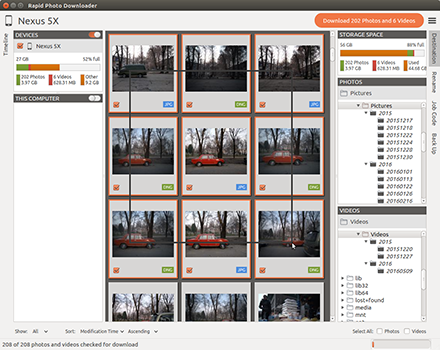
Once the thumbnails have been selected, check or uncheck one of the files you have selected. This will affect all of the selected files:
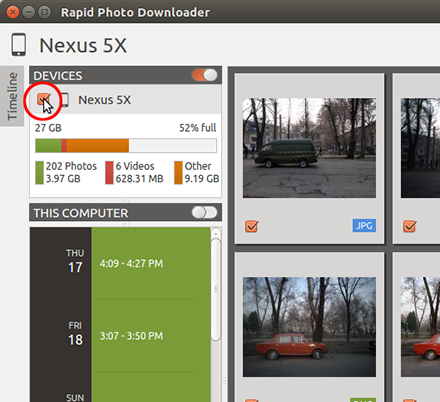
The second way to check or uncheck multiple thumbnails is to use the checkbox beside the device or This Computer folder in the Download Sources on the left side of the window:
Thumbnails can be sorted using a variety of criteria:
- 1 Modification Time: when the file was last modified, according to its metadata (where available) or according to the filesystem (as a fallback).
- 2 Checked State: whether the file is marked for download.
- 3 Filename: the full filename, including extension.
- 4 Extension: the filename's extension. You can use this to group JPEG and RAW images, for instance.
- 5 File Type: photo / video.
- 6 Device: name of the device the photos and videos are being downloaded from.
Thumbnails are sorted by ascending or descending order. For options 2-6, the secondary sort order is by modification time.
Tip: The sort order of thumbnails in the main window has no effect on the order in which photos and videos are downloaded. Photos and videos are always downloaded such that the oldest files are downloaded first, on a per device basis.
Use the Timeline to identify photos and videos taken at different periods in a single day, or over consecutive days.
The Timeline has features in common with a calendar, but it is not a calendar. Instead, it shows clusters of photos and videos, grouped by time. The Timeline is more like a dynamic timetable generated from your own work. Its rationale is that things that were made together probably go together.
Here is how it functions: the Timeline groups photos and videos based on how much time elapsed between consecutive shots. In a sequence of shots, if between one shot and the next shot there is a gap in time larger than the value the Timeline is set to, a new group starts.
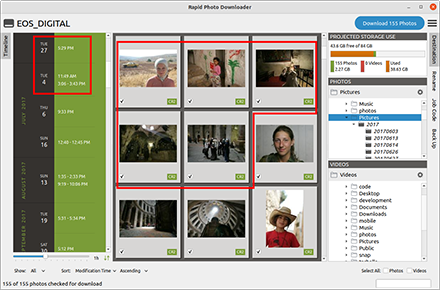
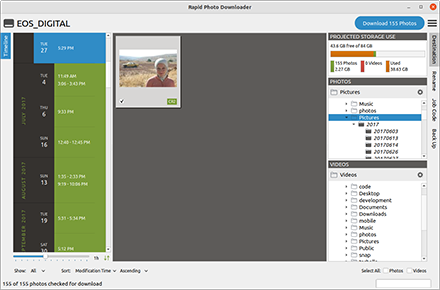
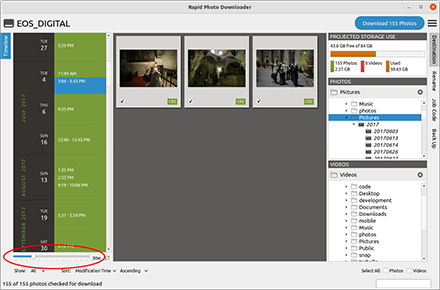
To illustrate, consider five photos, taken in June and July. In the screenshot, the upper left date-times correspond to the five photos:
Of these five photos, the first was taken on the 27th of June at 5:29 PM. In the next screenshot, its row in the Timeline is selected. Selecting a row means photos and videos only from that row are displayed:
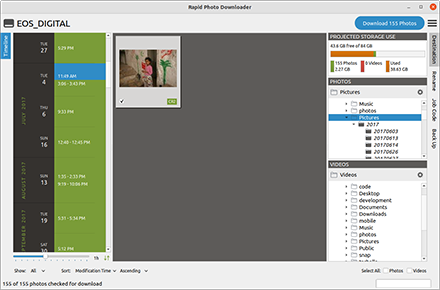
The next photo was taken on July the 4th at 11:49 AM. Again its row is selected, and it is the only shot displayed:
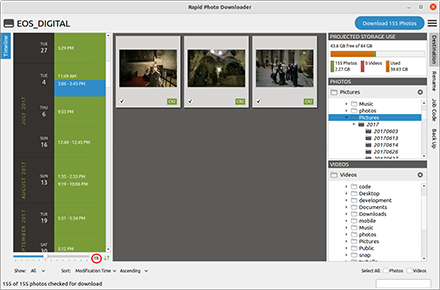
The last three of the five photos were taken closer in time together, on the same day as the previous photo, but from 3:06 - 3:43 PM. They are grouped together because the Timeline is set to group photos with less than an hour elapsing from one shot to the next shot in the sequence. That is why the shot from earlier in the day is not grouped with these three, becuase the gap betweeen 11:49 AM and 3:06 PM is more than an hour:
The red circle in the above screenshot shows 1h, meaning the Timeline is set to one hour. The valuess that can be set range from 5 minutes to 24 hours, incrementing in a non-linear manner.
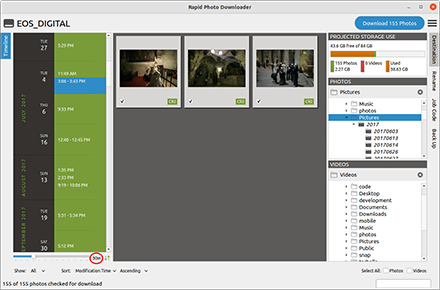
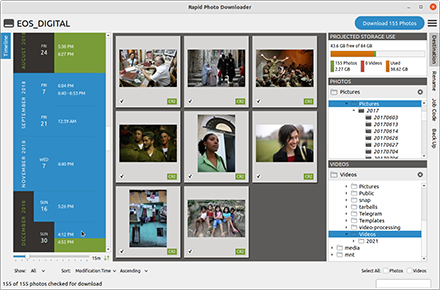
It is important to note that it is irrelevant that the first shot in this sequence of three shots was taken within one hour of the third. What matters is the gap between one shot and the very next shot. To illustrate, consider when the Timeline is set to 30 minutes:
In the above screenshot, the shots are still in a group of three because the first of the group was taken within 30 minutes of the second, and the third was taken within 30 minutes of the second (not the first).
The Timeline's slider adjusts the time elapsed between consecutive shots that is used to build the Timeline:
To view shots in for a particular time range, use the mouse (optionally in combination with the Shift or Ctrl keys) to select time periods in the Timeline. When a time range is selected, the Timeline button on the left side of the main window is highlighted.
Tip: A download always includes all files that are checked for download, including those that are not currently displayed because the Timeline is being used.
This section describes the Timeline as it functions in version 0.9.29. Earlier versions behave differently.
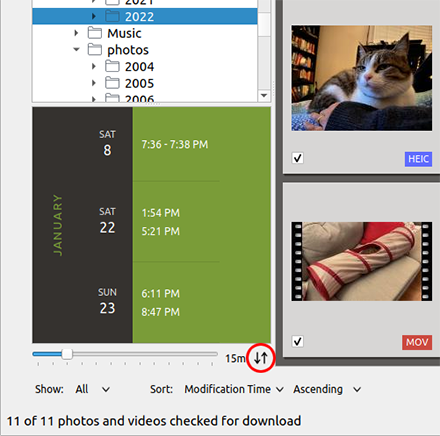
Rapid Photo Downloader can synchronize the scrolling of the Timeline and Thumbnails. You can turn this feature on and off by clicking on the Toggle button:
The button changes color to indicate whether the Timeline and thumbnails can in fact be scrolled together. If either the Timeline or the thumbnails lack a scrollbar, there is no scrolling ot synchronize. In that case, when the feature is on, the button's color is black, as in the screenshot above.
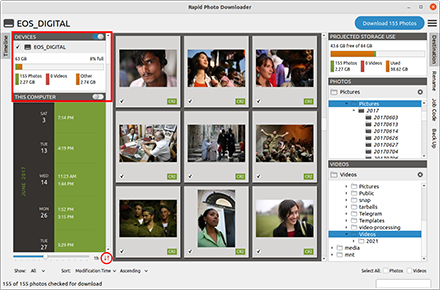
Even when both the Timeline and the thumbnails have scrollbars, however, that does not automatically mean the scrolling will be synchronized. Scrolling is synchronized only when the feature is turned on and both the Devices and This Computer panels are not visible in the main window. For instance, in this screenshot the scrolling will not be synchronous because the Devices panel is showing a source device, and the This Computer panel title and toggle switch is visible too:
The scrolling will become synchronized when you scroll down the Timeline so that the entirety of the Devices and This Computer panels are scrolled out of view, or by clicking on the Source button at the top left of the window to hide the download sources. The button's color turns green to indicate synchronized scrolling is now active:
The scrolling is synchronized by using the topmost visible row. The thumbnails will scroll when you adjust the Timeline's scrollbar, and likewise, the Timeline will scroll when you adjust the thumbnails' scrollbar.
Sometimes the Timeline needs to be rebuilt as thumbnails are being generated or a download is occurring. The Timeline shows when shots were taken. The time a shot was taken is found in a photo or video's metadata. Reading the metadata is time consuming, so Rapid Photo Downloader avoids reading the metadata while scanning files. Instead it uses the time the file was last modified as a proxy for when the shot was taken. The time a shot was taken is confirmed when generating thumbnails or downloading, which is when the metadata is read.
Rapid Photo Downloader can download from multiple devices simultaneously. For example you can download from one or more cameras at the same time, or one or memory cards, or any combination of them. It can also back up to multiple devices like external drives simultaneously, while it downloads.
One of Rapid Photo Downloader's most useful features is its ability to automatically generate download subfolders and rename files as it downloads, using a scheme of your choosing.
To specify where you want your files downloaded and how you want them named, open the appropriate panel on the right-side of the application window: Destination, Rename or Job Code.
When storing your photos and videos on a computer, they are organized into a hierarchy of folders, called the directory structure. Before finalizing that directory structure for your photos and videos, choose wisely — plan on using the same directory structure scheme for many years!
It's impossible to overemphasize how helpful it is to use a scheme that systematically and consistently places your photos and videos into a predictable destination. As the American Associate of Media Photographers put it, the photo and video directory structure "should be stable and scalable; it should not fundamentally change, only be added to".
Devise a download destination scheme that takes advantage of Rapid Photo Downloader's ability to automatically generate download subfolders using file metadata, such as the date the photos or videos were created. You can also add text to folder names at the time of download.
When thinking about your download directory structure, keep in mind two different types of directory:
- 1The Destination folder, e.g. "Pictures", "Photos", or "Videos". This directory should already exist on your computer.
- 2The download subfolders, which are directories that will be automatically generated by Rapid Photo Downloader. They need not already exist on your computer, but it's okay if they do. They will be generated under the Destination folder.
You can download photos and videos to the same Destination folder, or specify a different Destination folder for each. The same applies to the download subfolders for photos and videos — download photos and videos to the same subfolders, or use a different scheme for each type.
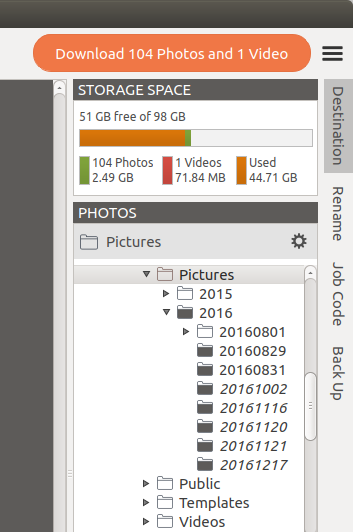
Automatically generated subfolders can contain further automatically generated subfolders if need be. For example a common scheme is to create a year subfolder and then a series of year-month-day subfolders within it, which is the scheme I use myself:
The above image illustrates several useful attributes:
- 1The Destination folder is in this instance "Pictures". The name of the Destination folder is displayed in the gray bar directly above the tree, with a folder icon to its left and an icon of gear to its far right.
- 2The Destination folder tree shows the download subfolders already on your computer (those in a regular, non-italicized font), and the subfolders that will be created during the download (those whose names are italicized)
- 3The folder tree also shows into which subfolders the files will be downloaded (those colored black)
Download subfolder names are typically generated using some or all of the following elements:
- 1File metadata, very often including the date the photo or video was created, but might also include the camera model name, camera serial number, or file extension e.g. JPG or CR2. Naming subfolders with the year, followed by the month and finally the day in numeric format makes it easy to keep them sorted in a file manager.
- 2A Job Code, which is free text you specify at the time the download occurs, such as the name of an event or location.
- 3Text which you want to appear every time, such as a hyphen or a space.
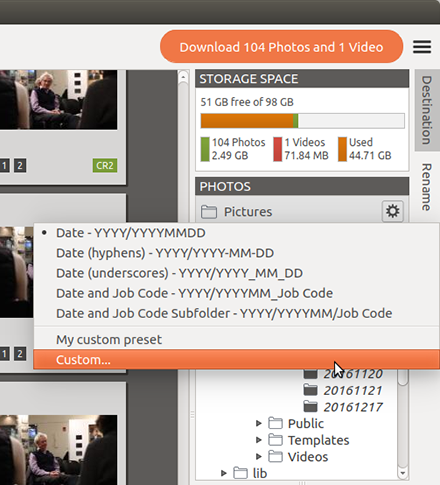
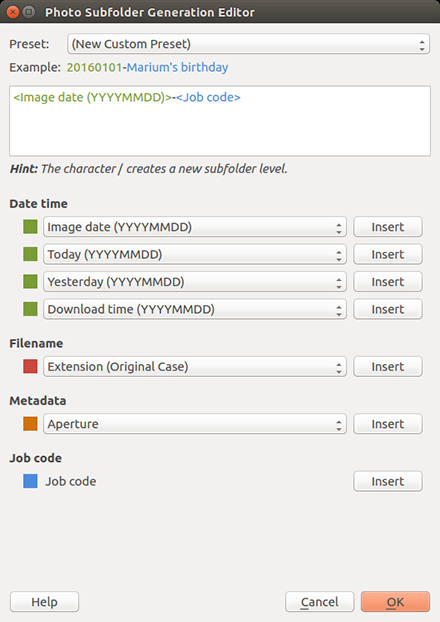
To configure Rapid Photo Downloader to automatically create download subfolders as it downloads, you can use one of Rapid Photo Downloader's built-in presets, or create a custom preset. Click on the gear icon to bring up a drop-down menu:
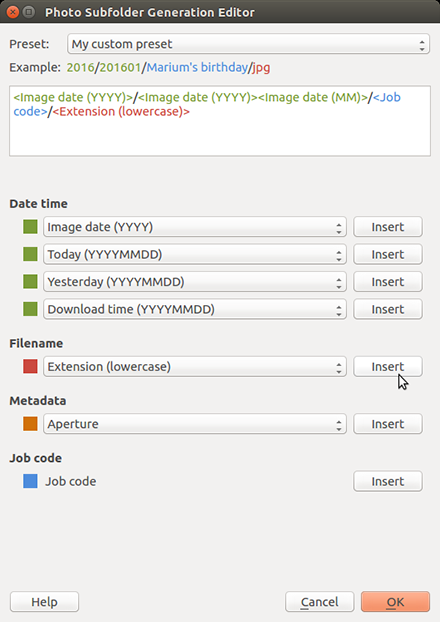
Using the drop-down menu, select a built-in preset or click on Custom to configure your own scheme using the Photo or Video Subfolder Generation Editor:
The image above shows a custom preset named "My custom preset".
Tip: You are not limited to the built-in date/time choices. You can combine two date/time choices to generate new combinations. For example, the picture above illustrates combining year (YYYY) and month (MM) to form YYYYMM.
Tip: If you prefer, you do not have to create nested download subfolders. For example, the picture below illustrates the generation of download subfolders that contain only the date the photos were taken and a Job Code:
Use Rapid Photo Downloader's file renaming feature to generate meaningful file names using criteria you specify. You are not limited to the default presets. Combine the following options to generate limitless variations.
Tip: Put careful thought into choosing a worthwhile system for generating filenames, particularly if you store tens of thousands of photos or more. Ideally you should use the same naming scheme for decades. See Choosing Suitable Image Filenames below for helpful tips and best practices.
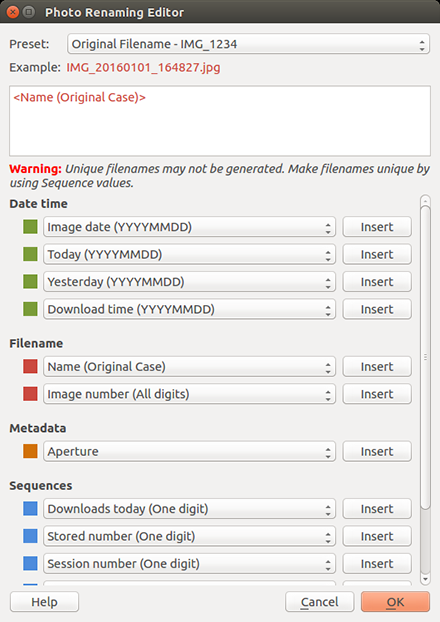
The Photo (and Video) Renaming Editor is very similar to the Download Subfolder Generation editor. The following picture illustrates the editor with the built-in "Original Filename" preset:
The picture above displays a warning indicating the unique filenames may not be generated, because in this case the filenames are merely those generated by the camera. Most cameras do not generate unique filenames, so when you've taken enough photos or videos, it's inevitable that quite different photos and videos are going to end up with the same filename — which is far from ideal.
Use the Renaming Editor to choose from among the following options (below).
There are three types of date and time choices available:
- 1Image date or Video date: when the photo or video itself was taken
- 2Today or Yesterday: the time the actual file is being downloaded
- 3Download time: the time at which the download was started. If there is more than one device being downloaded from at one time, the time for the first device will be used.
The options available for both are the same, except for the additional choice of subseconds with the photo date and time.
Built-in Date and Time options are:
- 1YYYYMMDD: Year (4 digits), month and day
- 2YYYY-MM-DD: Year (4 digits), month and day, with a hyphen between them
- 3YYYY_MM_DD: Year (4 digits), month and day, with an underscore between them
- 4YYMMDD: Year (2 digits), month and day
- 5YY-MM-DD: Year (2 digits), month and day, with a hyphen between them
- 6YY_MM_DD: Year (2 digits), month and day, with an underscore between them
- 7MMDDYYYY: Month, day and year (4 digits)
- 8MMDDYY: Month, day and year (2 digits)
- 9MMDD: Month and day
- 10DDMMYYYY: Day, month and year (4 digits)
- 11DDMMYY: Day, month and year (2 digits)
- 12YYYY: Year (4 digits)
- 13YYYY: Year (2 digits)
- 14MM: Month
- 15DD: Day
- 16Month (full): Month (text format)
- 17Month (abbreviated): Month (abbreviated text format)
- 18Weekday (full): Weekday (text format) — new in version 0.9.11
- 19Weekday (abbreviated): Weekday (abbreviated text format) — new in version 0.9.11
- 20HHMMSS: Hours, minutes, and seconds
- 21HHMM: Hours and minutes
- 22HH-MM-SS: Hours, minutes, and seconds, with a hyphen between them
- 23HH-MM: Hours and minutes, with a hyphen between them
- 24HH: Hour
- 25MM: Minute
- 26SS: Second
- 27Subseconds: Subseconds (only for photos, and only if supported by your camera)
Tip: If subseconds metadata is not available in a photo being downloaded, that component of the filename will be ignored.
Tip: If your preferred date/time format is not listed above, combine the options to fit your liking, e.g. YYYY-MM.
Filename options are:
- 1Name: The filename, excluding the extension
- 2Image number: The component of the filename which is made up of a series of numbers. These are the numbers which are automatically incremented by the camera (typically 4 digits in length). For example, the image number of the filename IMG_0524.CR2 is 0524. For a filename like VD1D7574.CR2, it is 7574. You can specify how many digits should be used: all of them, or the last one, two three or four digits.
Metadata options for photos include:
- 1Aperture: aperture value used, recorded in the EXIF field
- 2ISO: the ISO value used
- 3Exposure time: how long the exposure was for — see Representation of Exposure Time for details
- 4Focal length: focal length used
- 5Camera make: Manufacturer of the camera, e.g. NIKON CORPORATION, Canon
- 6Camera model: the model name as specified by the manufacturer, e.g. NIKON D300, Canon EOS-1Ds Mark III
- 7Short camera model: derived from Camera model, but in shortened form without the manufacturer name, e.g. D300, 1DsMkIII, XSi
- 8Hyphenated short camera model: like Short camera model, but includes any information from the Camera model next to a hyphen, e.g. DSC-P92 instead of P92
- 9Serial number: applicable to select Canon, Nikon, Olympus, Panasonic, and Fujifilm cameras
- 10Shutter count: applicable to select Nikon SLRs only
- 11Owner name: applicable to select Canon SLRs where the owner name has been uploaded to the camera
For photographers, exposure times of less than one second are normally expressed in fraction form, e.g. 1/125. This format is not helpful when naming files, because the forward slash is an illegal filename character for some operating systems. To work around this problem, Rapid Photo Downloader formats exposure times without using the forward slash:
- 1For exposures less than one second but more than or equal to one tenth of a second, the result is formatted as a one character length integer e.g. 3 represents 3/10 of a second
- 2For exposures less than one tenth of a second, the result is formatted as an integer e.g. for an exposure that was 1/125 of a second, the value is 125
- 3For exposures greater than or equal to one second, the value is formatted as an integer with a trailing s e.g. 30s represents 30 seconds
Video metadata options can be used in video renaming and video subfolder creation.
Metadata options for videos include:
- 1Codec: the video's codec, e.g. H.264 AVC
- 2Width: the video's width in pixels
- 3Height: the video's width in pixels
- 3Length: the video's length, in seconds, rounded to the nearest second
- 5Frames Per Second: the video's frames per second, rounded to the nearest second (available only with some file formats)
The key to understanding sequence numbers is that they increment each time a photo or video is successfully downloaded. (If a photo or video is skipped, or not downloaded because of an error, then the sequence number is not incremented.)
Rapid Photo Downloader uses these sequence numbers:
- 1Downloads today: tracks downloads completed during that day.
- 2Stored number: similar to Downloads today, but it is remembered from the last time the program was run.
- 3Session number: reset each time the program is run. In other words, restart the program, and the Session number will restart with the value 1 assigned to the first photo or video downloaded. The second photo or video downloaded will be assigned the value 2, and so forth.
- 4Sequence letter: like session numbers, but uses letters.
Tip: Sequence values are shared among both video and photo downloads. If you use sequence values only in photo filenames, for instance, downloads of videos will still increment the sequence values being used.
The number of digits used to generate the sequence number can be specified to be one of one, two, three, four, five or six digits in length. Specifying an option longer than One digit is helpful when you want to keep overall filename length consistent, because sequence number values less than the length specified by you will be padded with zeros preceding the actual value, e.g. 0001.
Tip: If the length of the sequence number is longer than the length you specify, then the actual length of the sequence number will be used. For example, if you specify One digit, and the sequence number is 1067, then 1067 will be included in the filename. Sequence numbers are never truncated.
Stored and session numbers are incremented only when you use them. For instance, if you download some photos without using these sequence numbers, and then download some more photos using them, the prior download will have no effect on the value of the sequence numbers.
This sequence number tracks the number of successful downloads made on any one day. During each new day, the sequence number is reset to zero.
In contrast to other sequence numbers, this sequence number is updated regardless of whether it is used or not. That is, whether or not you use the Downloads Today sequence number as part of the photo or video file name, the number will always reflect how many successful downloads were completed on that day.
See Rename Options to learn more about the Day start option.
Sequence letters are generated using the pattern a, b, ...z, aa, ab, ...zz, aaa, aab, and so forth. Like stored and session numbers, they are incremented only when you use them.
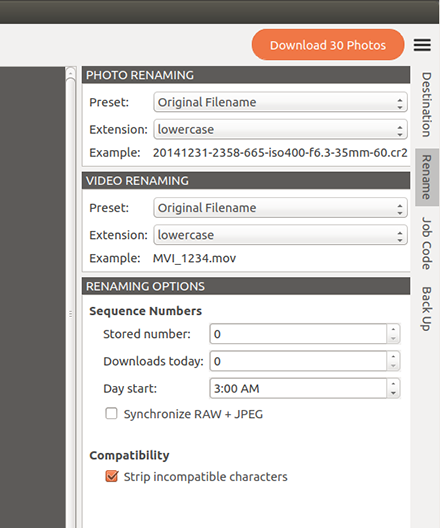
Renaming options affect photo, video and download subfolder names.
Here you can set the values for Downloads today and the Stored number, if you need to adjust them for some reason.
You can also specify the time a day "starts". This is useful if you use the Downloads today sequence number and often photograph something late at night (e.g. concerts) and you want to start a download after midnight. Here you might like to specify that a new day to "start" at 3 a.m., for instance (which is the default).
This option is useful if you use the RAW + JPEG feature on your camera and you use sequence numbers or letters in your photo renaming. Enabling this option will cause the program to detect matching pairs of RAW and JPEG photos, and when they are detected, the same sequence numbers / letters will be applied to both photo names. Furthermore, sequences will be updated as if the photos were one. For example, if 200 RAW photos and 200 matching JPEG photos are downloaded, the value of Downloads today will be incremented by 200, and not 400. The same goes for the rest of the sequence values, including the Stored number sequence number.
Matching photos are detected by comparing filenames, as well as the date/time exif values.
Tip: For photos to match, the date/time exif values do not have to match exactly. There is a 30 second leeway to allow for the time it can take for a camera to write a file to its memory card(s).
The Synchronize RAW + JPEG option will take effect regardless of whether the RAW and JPEG photos are stored on different memory cards or the same memory card. Furthermore, if they are stored on separate memory cards, you can download from them simultaneously or one after the other. The only requirement is to download the photos in the same session — in other words, for the feature to work, use as many memory cards as you need, but do not exit the program between downloads of the matching sets of photos.
Logically, problems can arise when synchronizing RAW + JPEG sequence values. Rapid Photo Downloader handles such problems like this:
- 1Duplicate files: when two files with the same file name and the same date/time exif values are encountered, an error occurs. How the error is handled depends on the program's configuration. If Error Handling is set to Skip download, the duplicate file is not downloaded. If Error Handling is set to Add unique identifier, the file is downloaded, assigned the same sequence number as its duplicate, and has an identifier added to the end of the file name.
- 2A mismatch in the date/time values between otherwise matching pairs: if two files have the same name, e.g. IMG_1234.CR2 and IMG_1234.JPG, but differing date/time exif values, an error occurs. The program logs an error report, but both files are nonetheless downloaded and assigned matching sequence numbers.
If checked, then characters that are invalid in filenames in operating systems other than Linux are stripped from the generated filename. These characters are: :, *, ?, ", <, >, and |. Furthermore, any white space (e.g. spaces) beginning or ending a folder name will be removed.
Tip: If you ever want to share your photos with people who use Microsoft Windows,™ then keeping this checked is a good idea.
You can have your photos and videos backed up to multiple locations as they are downloaded, such as external hard drives or network shares. Rapid Photo Downloader can be configured to:
- 1use as many backup devices as you can plug in
- 2automatically recognize backup devices as soon as they are inserted
- 3backup to a location that never changes, such a network directory
- 4backup photos to one device and videos to another, or use the same devices for both
The folder structure and filenames used for the backups will be identical to those used for downloading onto your computer's primary drive.
Tip: If you work with many photos — particularly RAW files — and videos you may find that your computer's capacity to store all of these files is overwhelmed. In such cases, your workflow will probably involve some kind of system where you have two copies of each file being stored on external drives or some other kind of backup medium. Backing up to two devices simultaneously is helpful for workflows of this kind.
Tip: You can use the same folder name for both photos and videos if you want them backed up to the same folder.
Backup devices are automatically detected by scanning devices to see if they contain either of the names specified in Photo folder name and Video folder name. In the illustration above, the drive photobackup does not contain a folder named Videos, so videos will not be backed up to it.
Tip: Whenever a device is plugged in, if backups are enabled, Rapid Photo Downloader will check to see if it can be used for backups before it will check to see if it is a device from which photos can be downloaded.
Job Codes are used as labels to describe sets of photos and videos. You can use them in subfolder and file names. If you want to use Job Codes, configure file renaming or download subfolder names to use them.
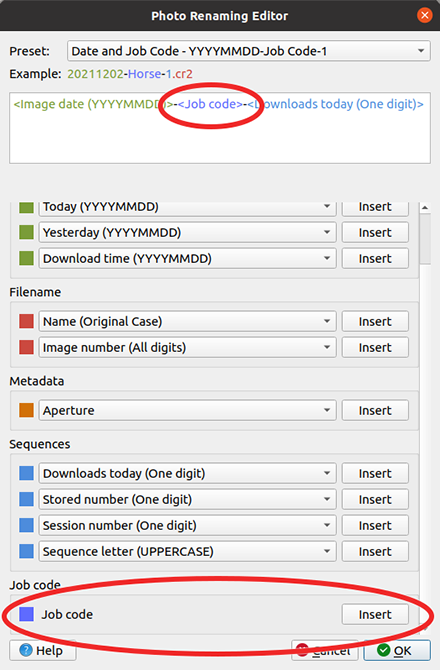
In the illustration below, a Job Code is being used in a preset to generate photo file names:
There are two approaches to adding Job Codes to files: applying them before the download begins, or applying them after the Download button has been clicked to begin the download:
- 1Applying Job Codes before the download begins is better when you need to apply more than one Job Code to the files to be downloaded.
- 2Applying a Job Code after the Download button has been clicked is better when you have only one Job Code to apply to all the files you wish to download.
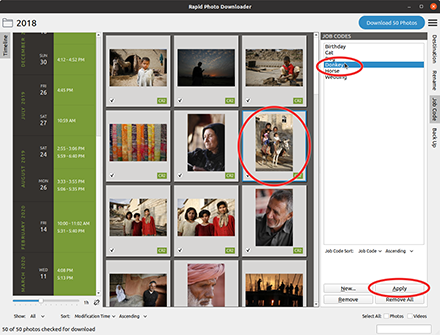
To apply an existing Job Code before the download starts:
- 1Select the files to apply the code to.
- 2Click on the Job Code and click the Apply button, or simply double-click the Job Code.
- 3You can apply multiple Job Codes to a download, or simply use the same one for the entire download.
This illustration demonstrates applying the Donkey Job Code to a single photo of a donkey:
Applying a new Job Code can be done in two ways:
- 1Selecting the files to apply it to, and the clicking on the New... button, or
- 2Not selecting any files, and clicking on the New... button to create Job Codes to use later.
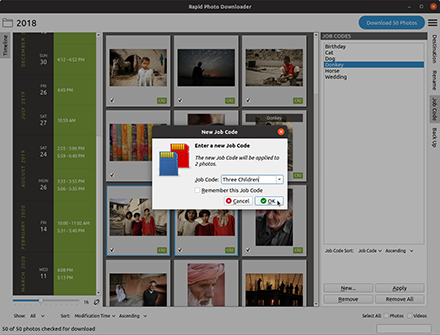
Here a new Job Code Three Children is to be applied to a couple of photos:
If you plan on using the Job Code again in future, click the checkbox Remember this Job Code.
If there are any files in the download that have not yet had a Job Code applied to them, you'll be prompted to enter a Job Code for them before the download begins:
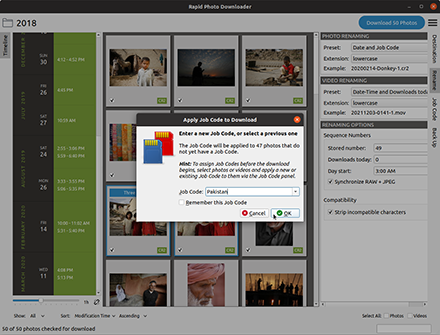
You can enter a new Job Code, or choose an existing Job Code.
Rapid Photo Downloader deals with three types of cache:
- 1An image cache whose sole purpose is to store thumbnails of files that have not necessarily been downloaded, but may have. It is called the Rapid Photo Downloader Thumbnail Cache, and is only used by Rapid Photo Downloader. It is typically located at /home/USER/.cache/rapid-photo-downloader/thumbnails/. (The actual location may vary depending on value of environment variable XDG_CACHE_HOME). The thumbnails are saved as jpegs using 75% compression. If a file in the cache has not been accessed for 30 days, it is deleted when the program exits.
- 2A temporary cache of files downloaded from a camera, one for photos and another for videos, which are used to extract thumbnails from. Since these same files could be downloaded, it makes sense to keep them cached until the program exits. They are located in a temporary subfolder in the download destination.
- 3The freedesktop.org thumbnail cache, in which Rapid Photo Downloader stores thumbnails of RAW and TIFF photos once they have been downloaded. Programs like Gnome Files, Nemo, Caja, Thunar, PCManFM and Dolphin use this cache too, meaning they will display thumbnails for those RAW and TIFF files as well. While generating these thumbnails does slow the download process a little, it's a worthwhile tradeoff because Linux desktops typically do not generate thumbnails for RAW images or large TIFFs. Finally, if the path files are being downloaded to contains symbolic links, a thumbnail will be created for the path with and without the links.
Rapid Photo Downloader uses its own dedicated Thumbnail Cache because it makes the display of thumbnails almost instantaneous for devices that have previously had their thumbnails generated. While useful in many workflows, it's not useful if you always download all shots from a shoot and never keep the downloaded shots on the camera or its memory cards. In this workflow, using the Thumbnail Cache slows down rather than speeds up Rapid Photo Downloader. For such a workflow, it's better to disable the Thumbnail Cache, which you can do via the Program Preferences.
On high resolution screens, also referred to as High DPI or HiDPI (High Dots Per Inch) displays, Rapid Photo Downloader will detect if special environment variables have been set that instruct Qt5 applications to scale their display. These environment variables are:
- QT_SCALE_FACTOR
- QT_SCREEN_SCALE_FACTORS
- QT_AUTO_SCREEN_SCALE_FACTOR (Qt versions older than 5.14)
- QT_ENABLE_HIGHDPI_SCALING (Qt versions 5.14 or newer)
If none of these environment variables are set, Rapid Photo Downloader will automatically enable high DPI scaling. If they are set, Rapid Photo Downloader will do as they instruct. If for some reason you do not want this, set one of these variables before starting Rapid Photo Downloader.
Tip: On some Linux distributions, if you use GNOME on Wayland, you need to set the environment variable QT_QPA_PLATFORM to the value wayland. If not set, the Rapid Photo Downloader window could appear blurry.
Advanced users may consult the Qt documentation or the ArchLinux documentation.
As of version 0.9.27, Rapid Photo Downloader will run under Windows 11 using WSLg on WSL 2.
Tip: Using the Windows Subsystem for Linux Preview from the Microsoft Store is strongly recommended. Using the version of WSL that comes installed with Windows 11 can cause severe usability issues while running some programs, including Rapid Photo Downloader.
Rapid Photo Downloader in WSL behaves a little differently from a regular Linux environment. Limitations and requirements include:
- 1The Windows user launching Rapid Photo Downloader under WSL must be an Administrator in Windows, i.e. be a member of the Administrators group. They must also have sudo privileges in the WSL Linux instance.
- 2Devices like cameras and phones currently cannot be downloaded from, because they are not visible to WSL. Using USB passthrough is currently untested in Rapid Photo Downloader, but may work.
- 3The only devices that can be downloaded from are devices that Windows recognizes as local or removable drives. Mounting Linux disks directly in the WSL Linux instance is currently untested in Rapid Photo Downloader.
- 4It follows from the previous two points that a “Device” in Rapid Photo Downloader under WSL is a Windows drive.
- 5Program performance will be slower than under native Linux because Windows disk perfomance is slower under WSL 2.
WSL by default mounts local Windows drives, e.g. the C: drive, under /mnt. Removable drives like card readers are not mounted by default in WSL.
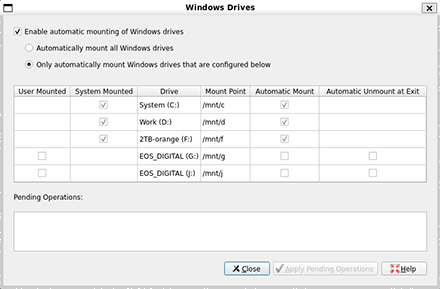
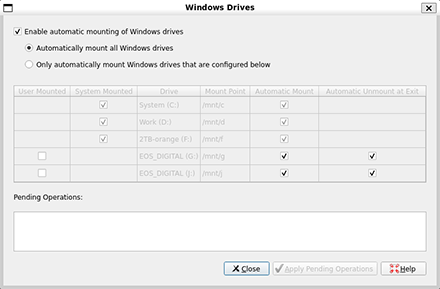
Because downloading from removable devices like card readers is of paramount importance to Rapid Photo Downloader, when running under WSL Rapid Photo Downloader allows you to mount and unmount removable Windows drives. When a drive is inserted that is not automatically mounted, the Windows Drive dialog window will automatically appear:
You can access this dialog window from the main program menu. The keyboard shortcut is Ctrl-D.
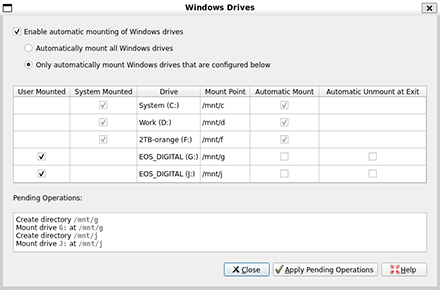
To manually mount a drive, click on its checkbox under the User Mounted column, then click the Apply Pending Operations button:
Rapid Photo Downloader will create the mount point (if necessary), and mount the drives. You may need to enter your password — see the next section for details.
To unmount a user mounted drive, simply uncheck the drive's checkbox in User Mounted column.
Tip: Unmounting a device when Rapid Photo Downloader exits is useful because if you want to eject a removable drive from Windows, it must first be unmounted in the WSL.
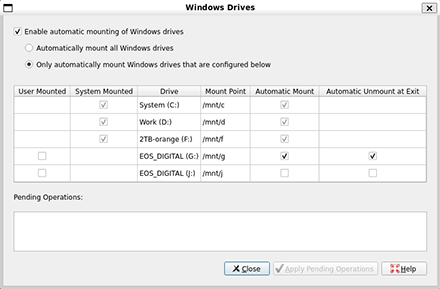
Using the Windows Drive dialog window, you can configure Rapid Photo Downloader to automatically mount and unmount removable Windows drives. Use the checkboxes in the Automatic Mount and Automatic Unmount at Exit columns to automatically mount and unmount drives:
Automatic Unmount at Exit refers to when the program exits. If you want to unmount a device when a download finishes, change the Automation Preferences.
To automatically mount and unmount all removable Windows drives, click on the radio button Automatically mount all Windows drives:
You cannot use the Windows Drive dialog to mount or unmount drives that WSL automatially mounts itself. These drives are displayed for your information.
Tip: Windows classifies some models of external USB drives as local drives, not removable drives, despite them physically being removable. Such drives will be automatically mounted by WSL if they are plugged in before you start WSL. If you plug them in after WSL has started, you can use Rapid Photo Downloader to mount them.
By default, WSL requires your Linux user's login password to mount and unmount removable drives. When the password is required, Rapid Photo Downloader will display a small dialog window prompting for your password. This example shows the username damon, which will of course likely differ on your system:
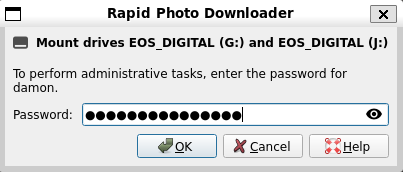
If you enter the wrong password, you will be prompted to enter the correct password. If you cancel, the mount or unmount operation will be cancelled.
Tip: Rapid Photo Downloader does not save or log your password.
The password you enter is hidden. To reveal the password, click the eye icon:
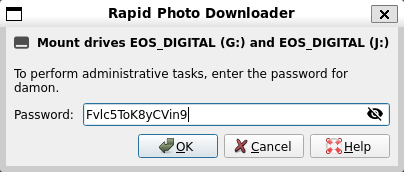
Rapid Photo Downloader uses the Windows programs Wmic.exe and vol to identify Windows drives. It uses the standard Linux commands mount, umount, and mkdir to create their mount points (if necessary) and mount / unmount them; it prefixes these commands with sudo.
Tip: Typically in Linux when a drive needs to be mounted without administrator access, a field containing the value user the mount's /etc/fstab entry is used to indicate this. Unfortunately this does not work with Windows drives mounted in WSL.
- 1To avoid prompting for the password unecessarily, Rapid Photo Downloader first attempts to exectute the mount and unmount operations without passing a password to sudo. Only if it fails does Rapid Photo Downloader prompt for the password.
- 2The password is not saved by Rapid Photo Downloader, nor is it logged. Instead, when a drive needs to be mounted or unmounted, the password is immediately passed to sudo.
- 3The sudo configuration controls how long the password is remembered before it prompts you for it again.
- 4If you prefer not to be prompted for your password when you mount or unmount Windows drives, edit your sudo configuration using visudo. If you want to learn about visudo, DigitalOcean has a useful tutorial.
- 5If there is an entry in /etc/fstab for the mount, Rapid Photo Downloader will use that. Otherwise, it will mount the drive as is typically done in WSL.
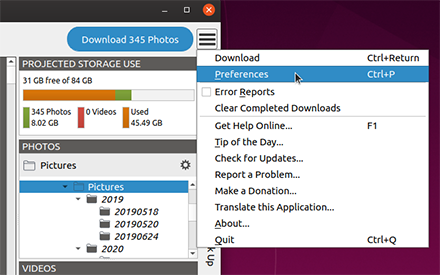
Access the Program Preferences using the main menu:
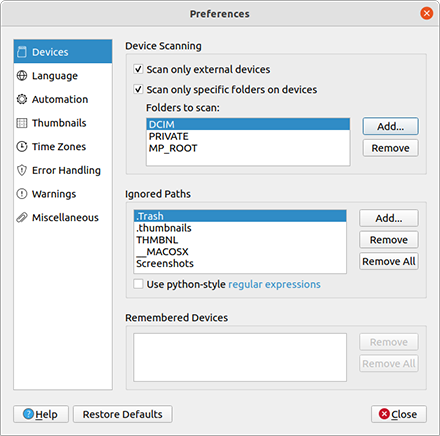
The Restore Defaults button restores default values only for those preferences currently displayed in the Program Preferences dialog.
By default, Rapid Photo Downloader scans for photos and videos only on devices that are external to the computer, including cameras, memory cards, external hard drives, and USB flash drives. Turning off this setting means that any mount point listed in /etc/fstab (excluding / and swap) has the option of being scanned as a device.
By default, the program will only scan the folders DCIM, PRIVATE, and MP_ROOT on external devices like cameras and memory cards, but you can change these defaults by adding or removing folder names. This is particularly useful for camera and phone manufacturers whose devices save photos and videos in locations that differ from the DCIM specification.
These folders must be at the base of the file system. For instance, if the phone saves its pictures into a subfolder "Camera Roll" within the folder "Pictures", you must specify the "Pictures" folder be scanned. The reason for this is technical — on some devices, certain folders are not meant to be read via MTP, and attempting to do so will cause the connection to the phone to freeze.
Tip: With smartphones, scanning the entire device is generally a bad idea, leading to poor performance.
Ignored Paths are useful when you are downloading from a device or location that contains one or more subfolders from which you do not want to download. For example, some cell phones include a subfolder that contains thumbnails of the photos and videos you've taken, such as a .thumbnails subfolder in the DCIM folder. Here you can specify which subfolders you do not want scanned for files. You do this by specifying only part of the subfolder's path, which is typically just the name of the subfolder itself.
For example, if you do not wish to download photos and videos from the subfolder Camera, simply add the value Camera to the list of ignored paths. There is no need to specify the entire path.
If you select the option for using python-style regular expressions, you can use Python's powerful regular expressions syntax to specify which subfolders to ignore. The pattern you specify will be incorporated into a pattern that begins with .* and ends in $ (meaning all characters up to the start of your pattern, your patten, and then the end of the line). For instance, the pattern [Tt]humbnails will match both of these paths:
/media/device/DCIM/.thumbnails
/media/device/DCIM/.Thumbnails
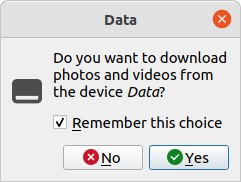
When you download from devices, and Scan only specific folders on devices is not set, Rapid Photo Downloader will prompt whether you want to ignore or download from a device. You have the option whether to remember the choice you make:
In this illustration, the device Data is a Remembered Device:
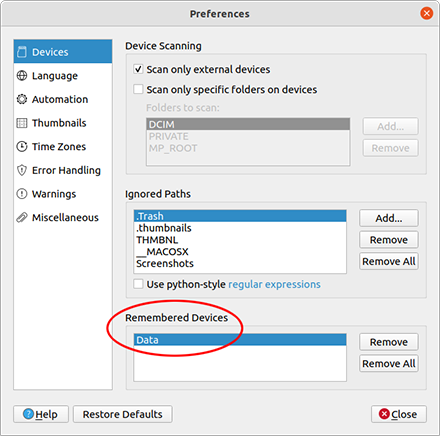
If you want to undo a choice you previously made about devices to always ignore or download from, you can remove it from the list of Remembered Devices using the Remove or Remove All buttons.
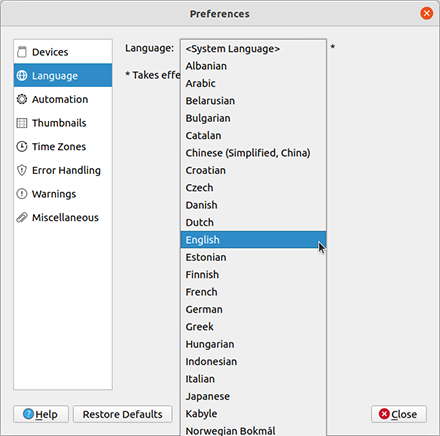
By default, the user interface language is automatically detected using the system language. If you want to override this, you can choose one of the supported languages from the drop-down list. The change occurs only once the program has been restarted.
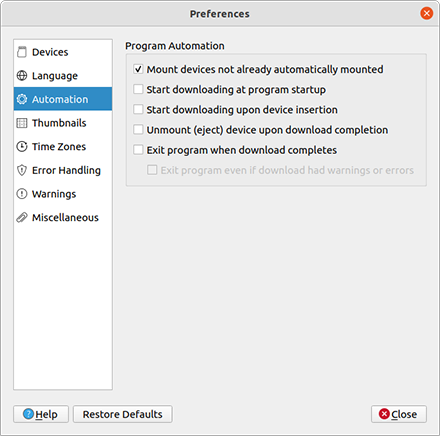
There are six ways to automate the download process:
- 1Mount devices not already automatically mounted: If turned on (the default), Rapid Photo Downloader will automatically mount devices if the Linux desktop has not already done so. Not all Linux desktops are configured to automatically mount devices like memory cards. For instance, a desktop like KDE can choose to not automatically mount devices. Meanwhile, sometimes Linux desktop code contains bugs that results in devices failing to mount even when they were supposed to.
- 2Start downloading at program startup will download from whatever devices are plugged in as soon as Rapid Photo Downloader is started.
- 3When Rapid Photo Downloader is already running, Start downloading upon device insertion will start downloading from devices as soon as they are plugged in. This is especially useful when you are downloading from more than one device at a time.
- 4Unmount (eject) device upon download completion allows you to remove a device from your computer as soon as photos and videos have finished being copied from it.
- 5Exit program when download completes causes the program to exit once all downloads are complete, as long as no errors or warnings of any kind were issued.
- 6Exit program even if download had warnings or errors will cause the program to exit after download completes irrespective of any warnings or errors.
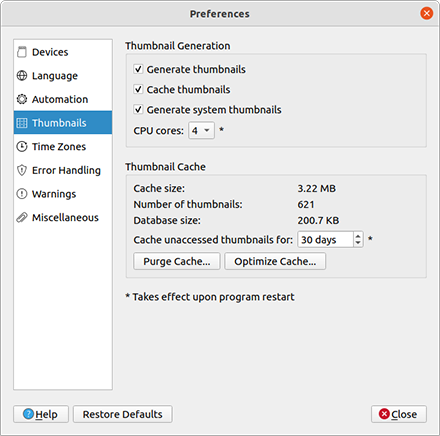
By default thumbnails are shown in the program's main window. You can speed up the download process by turning off thumbnail generation, which will also inhibit the generation of system thumbnails.
When a thumbnail is generated, by default the program stores it in its Thumbnail Cache. In some situations, it makes sense to disable the Thumbnail Cache.
While downloading, the program can save thumbnails that are displayed by desktop file managers and other programs.
This setting changes the number of CPU cores used to generate thumbnails. Thumbnails are generated asynchronously and in parallel, using a load balancer to assign work to operating system level processes utilizing up to this number CPU cores. It is recommended to leave this value at its default setting. (Consult the FAQ to understand why generating thumbnails for photos on smartphones is painfully slow).
You manage the size of the Thumbnail Cache by adjusting its settings, which is useful if you are running low on disk space.
Caching thumbnails that have not been accessed for thirty days is a sensible default, but you can change it to anywhere between zero days and three years.
Purging the Thumbnail Cache means deleting all its thumbnails. Optimizing it means optimizing the sqlite3 thumbnail database, as well as ensuring the database and all its thumbnails are in sync with each other.
Feature introduced in version 0.9.29.
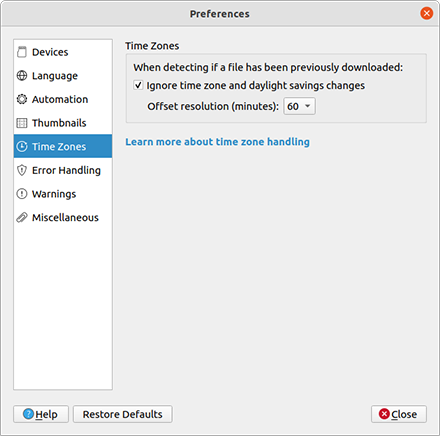
Changes in time zones or daylight savings can change the time it appears photos and videos were taken when they are viewed on the file system. Specifically, the file's modification time changes (despite its name, the date as well as time is recorded). Most cameras write to memory cards formatted using the FAT32 file system, which does not support time zones (the newer exFAT format does). That means when you shoot photos and videos in one time zone, and download the files in another — or have daylight savings start or end — the file modification time on the memory card file system will appear wrong.
The file system modification time is irrelevant to the photo's EXIF metadata, or the video metadata equivalent. But the file system modification time is highly relevant to determining if the file has been previously downloaded. Rapid Photo Downloader compares a file's size, name, and modification time to determine if it has downloaded it before. If any of these file attributes differ, the file is marked to be downloaded again. Time zone and daylight savings changes undermine this otherwise sensible approach.
To work around the problem of identifying files that should be downloaded while accounting for time zone and daylight savings changes, ensure the option Ignore time zone and daylight savings changes is enabled, and select the Offset Resolution appropriate to where your typically take photos and videos.
When Ignore time zone and daylight savings changes is enabled, the program will still compare a file's size, name, and modification time, but will also look for variations of the modification time using the offset resolution value.
The offset resolution is used as a multiple when calculating the offset from the time the photo or video was originally taken. It is best explained by example:
- 1 You take photos in the time zone UTC-5:00, download some of them while in that time zone, keep them on the memory card, and download the rest in UTC-8:00. The difference in time zones is three hours. Using an offset resolution of 60 minutes will work, because the three hour offset is a multiple of 60 minutes.
- 2 You take a photos in the time zone UTC+5:30 and head to UTC+1:00. You must use an offset resolution of 30 minutes, because the four and a half hour offset is a multiple of 30 minutes, not 60 minutes. This same offest resolution will also work if you take photos in UTC+2:00 and return to UTC+1:00, because one hour is also a multiple of 30 minutes.
- 3 You take photos in the time zone UTC+5:45 and head to UTC+3:30. You need to use the 15 minute offset resolution, because the 2 hour 15 minute difference is a multiple of 15 minutes. This 15 minute offset resolution will also work with one hour and half hour offsets, because they are both multiples of 15.
Rapid Photo Downloader defaults to using a 60 minute offset resolution because it is sufficient for most use cases, including daylight savings. A 15 minute offset resolution would handle all time zone changes — but it also increases the tiny probablity that a file might be identified as having already being downloaded when it in fact has not. For any one individual, the probability of this occurring is extremely low. But spread over many users, the chance of a misidentification is higher. The program therefore errs on the side of caution.
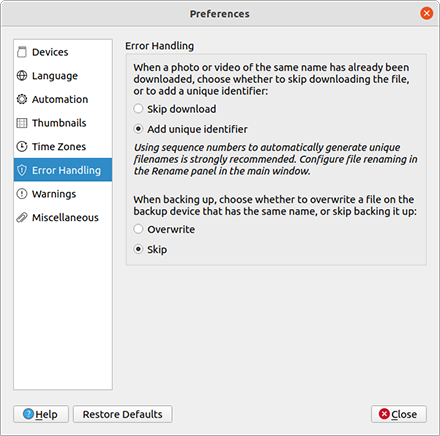
Rapid Photo Downloader will never overwrite an existing photo or video in your download folders (see Handling Backup Naming Conflicts for how duplicates in backups are handled). When two files with the same file name in the same download subfolder are encountered (whether from the current download or from a previous one), there are two ways to deal with it:
- 1skip downloading the photo or video
- 2download the file, but give it a unique identifier so that the existing photo or video is not overwritten
Unique identifiers are generated by adding a suffix _n (where n is a number) immediately before the image's filename extension. If it does not have an extension, the identifier will be placed at the end of the filename. The number is the lowest number that can be used without overwriting an existing file.
If a duplicate filename occurs in the backup location, Rapid Photo Downloader can be configured to overwrite it, or skip backing it up.
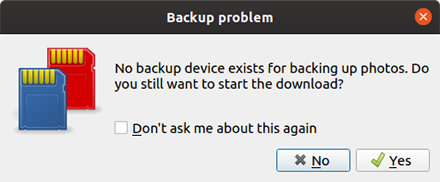
Rapid Photo Downloader conveys warnings and errors via warning message boxes and reports in the Error Reports window. For example this warning is shown when starting a download with backups enabled, and a backup destination is unavailable:
Using the Program Preferences, you can control which warnings are displayed:
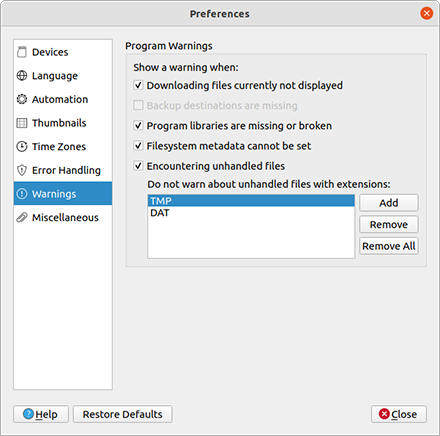
- 1Downloading files currently not displayed: when viewing a range of times and dates in the Timeline, or displaying only new files, it's possible to mark files for download that are not currently displayed in the main window. When enabled, the program can warn you about this before you start the download.
- 2Backup destinations are missing: when backups are enabled, the program can warn you when it's not possible to back up because the backup destinations are unavailable.
- 3Program libraries are missing or broken: warn if a software library such as libmediainfo is missing or not functioning.
- 3Filesystem metadata cannot be set: when writing to filesystems like NTFS, sometimes it's not possible to adjust a file's filesystem metdata (such as its modification time). If enable, the warning will appear as a report in the Error Report, with a maximum of one report per filesystem destination.
- 5Encountering unhandled files: warn after scanning a device or this computer if there are unrecognized files that will not be included in the download, with the exception of files with the filename extensions shown. If you add a file extension, there is no need to include the leading period (dot).
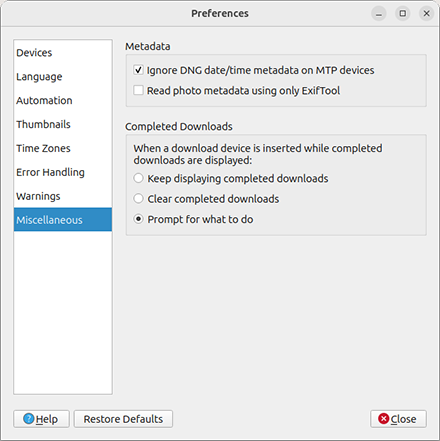
- 1Ignore DNG date/time metadata on MTP devices: Use this setting to ignore DNG date/time metadata when downloading from MTP devices (like cellphones and tablets). When it is ignored, the DNG file's modification time is used instead. Many (if not all) Android devices create bogus DNG metadata values.
- 2Read photo metadata using only ExifTool: To read photo metadata (including image thumbnails), the default is to use Exiv2, relying on ExifTool only when Exiv2 does not support the file format being read (e.g. Exiv2 cannot read CR3 files). Exiv2 is fast, accurate, and almost always reliable, but it crashes when extracting metadata from a small number of files, such as DNG files produced by Leica M8 cameras. If thumbnailing fails to finish, that likely indicates Exiv2 has crashed. If that happens, enable this option to use ExifTool instead. ExifTool is much slower than Exiv2, and it sometimes extracts different values for the same metadata, but it does not crash.
When a download device is inserted and downloaded files are already in the main window, the default behavior is for the program to ask if the completed downloads should be cleared, or displayed alongside the files from the new device. You can set the program's behavior to clear the thumbnails of the completed downloads, keep them, or to prompt you.
Several of the program's preferences can be set from the command line, including download sources, destinations, and backups. Additionally, the program's settings can be reset to their default state, and the Thumbnail Cache and remembered files cleared. To see the available command line options, from a terminal run:
rapid-photo-downloader --helpPlease feel encouraged to report any problem you find. By reporting any problems you find, you help improve the quality of Rapid Photo Downloader.
Tip: Upgrading to the latest version will allow you to determine if the problem you found has already been fixed.
On all versions of Rapid Photo Downloader, you can report a problem by clicking on the program's menu in the upper right corner of the main window, and choosing the menu item "Report a Problem". A very similar dialog window will automatically apppear if the program itself detects a problem.
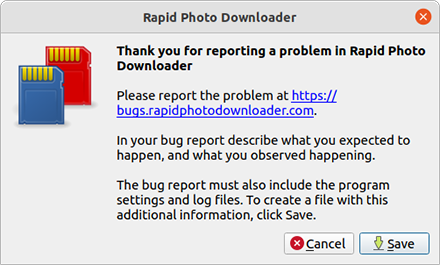
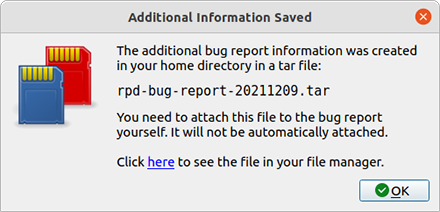
The program gives you the option of automatically saving a tar file with the program configuration file and log files to submit with your bug report.
If the tar file is saved correctly, you will see a window similar to this:
Click here to file a new bug report.
On the rare occasion the program was unable to create a tar file with bug information, a dialog window will appear telling you what to do next.
Manually gather the program configuration file and log files and attach them to your bug report. To include all the files in a single tar file rpd-log.tar located in your home directory, run this command (copy and paste it as one line in your terminal window):
The log files are located in the log directory ~/.cache/rapid-photo-downloader/log, and the configuration file is found in the directory ~/.config/Rapid Photo Downloader/.
Click here to file a new bug report.
No two photographers might ever agree on what makes an ideal filename for an image, but there are general principles that you might like to consider:
- 1Nothing except the extension of a camera generated filename is important enough not to replace with something better.
- 2Unique names mean you will never be confused as to which file is which — use Sequence values like Downloads Today to make filenames unique.
- 3Consistently including a classification component in the filename, linked to the subfolders it is stored in, makes it easy to locate whenever one of its derivatives is on a website or with a client.
- 4If exposure information is useful as you evaluate the quality of photos—for example, "was the shutter speed dangerously slow, or was a high aperture used?"—then consider making photo metadata a prominent part of the filename.
The American Society of Media Photographers' Digital Photography Best Practices and Workflow website contains guidelines on coming up with an excellent file renaming system. The project was funded by the United States Library of Congress through its National Digital Information Infrastructure and Preservation Program. These folks know their stuff!
To be able to download large volumes of photos and videos from memory cards with minimum fuss, keep these suggestions in mind:
- 1Ensure unique filenames are generated.
- 2Use as many card readers as practical.
- 3Set the option Start downloading upon device insertion.
- 4Set the option Unmount (eject) device upon download completion.
When configured like this, as soon as you attach a memory card, its photos will be downloaded. When the download from that memory card is complete, another one can be inserted. It will automatically start to download from that one, even if it is currently downloading from other cards.
If you like this software, please consider making a contribution. Thank you!
